Source
- Alexander Yanai Vol 11
- Reel 34, Track 4, Lesson 2
- Duration of the recording: 40 minutes
Synopsis
- Continuing from the previous lesson, in this lesson you explore the difference between closing the legs and opening the legs as you come up to sit from lying on your side with the bottom leg extended straight in front and the back leg bent behind, sliding both hands down along the floor on either side of your body.
- This lesson is part of the 529-532 series, and pulls from AY 527 On the side, caressing the straight legs
- It also invites for further exploration of the change of legs (forward to backward on the floor) in sitting (“who knows how to do shpagat (split) one hundred percent doesn’t have a problem.”)
Lesson Outline
- Lie on R side. R leg straight in front. L leg bent behind.
- L hand slides on the R leg in front, lift the leg (towards head)
- L hand slides from in front on the left leg (until the whole body participates)
- Lie on L side. L leg straight in front. R leg bent behind.
- R hand slides on the L leg in front (lift the L leg)
- R hand slides from in front on the R leg (which is bent backwards)
- Lie on the R side . extend L leg forward, right leg backwards
- R hand slides on the L leg in front
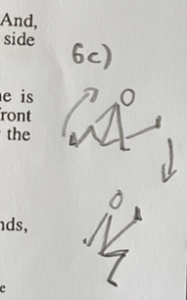
- Place hands on the both sides of the body, lift HEAD and move arms downward.
- Lift head and join legs a bit, lie on the back and spread them
- Change legs – R leg forward, L behind, lift head, move arms downward.
- Try to come up like this. On lifting join the legs, at going down spread them.
- L leg in front, R behind – continue lifting, spread legs.
- Lie on L side. Upper leg (R leg) forward. L leg behind.
- Come up like this – bring legs closer when going up.
- Slowly the opposite – widen legs when going up.
- Now change legs – R in front, L behind. Extend the arms down, lift the head. Why do legs become wider in this position, closer in another?
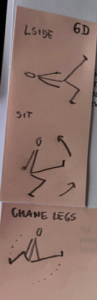
- Lie on the back. Spread legs like this. L in front, R behind. Sit, lie back.
- Change over the legs, R in front, left behind. Sit, lie down.
- Change over the legs – L in front, R behind. Come up, spread both legs, lie back down, bring them together.
- L on R side. R leg extend forward, L behind.
- Hands on the sides
- Come up and spread legs a bit
- Change sides – Lie on L side, L leg in front, R behind. Come up and move the left leg.
- R hand on the left knee or thigh. Come up and turn L leg to the L, go down and turn L leg to R. Find place for L hand so that it doesn’t move million times.
- Change sides – lie on R side, R leg front, L behind. Help with L hand on right knee or thigh. Come up and move the R leg, up and R leg more to R, down and R leg more to L.
- Sit like this – help with hands – continue movement with legs so that R leg goes even back further backward … and left leg forward. Change over the legs. (lift the pelvis as much as necessary). “Have the right leg go behind, but not in front… on the floor. This is very difficult. We will get to it in the coming lessons.”

- Lie on the other side (L side), extend left leg in front, come up to sit… (L leg to the left continues until it comes backward and right leg forward.

- Do it the accustomed way – Lie on the L, L leg in front. Come to sit, move the legs just as we did on the other side. Change over the front to the other side. Change over the legs. Change over the arms. “This also is very difficult.”
- Now to the other side.
- Lie on the back, R side.
- L leg forward, R leg backwards
- Change over the legs. R leg forward, L leg backward.
- Change over the legs and sit. L leg in front, R leg backward.
Look to the left, L leg goes backward.
- Stand up, walk. See how your hip joints are.
Focus of Moshe’s Teaching
- In 6a, Moshe says:
- “As always, in every thing like this, there is someone for whom the movement is so natural that it is a pleasure to see because what we are always teaching is movement that is structures. It results from the structure of the entire body, the structure of the nervous system; so for everybody, it slowly becomes a good movement.”
- In the most demanding part – changing over the legs when sitting, imagine the helicopter legs:
- “Whoever knows how to do a shpagat (split) one hundred percent does not have a problem. … But, do not do it. Do not ruin yourself now. Just try, try to do whatever you are able to do now. Good.
- Lie on the side, one leg in front other behind, extend the arms, lift the head:
- “If you pay attention during the movement you will see that you now lie so that femur lies on the floor with its outside far away, and the pelvis actually sits on the bone, on the corner of the pelvis. When you come up like this, the left leg must become wider because weight is on it… therefore, the body is in the direction of the bone. In the first movement, you turn the pelvis a bit to the left so as to lower the pressure from the head of the femur… When you lie on the side that holds the head of the great trochanter – this is on the floor with the pelvis. The movement of the bone is such that it makes the space you sit on wider…”
Related ATMs
- AY530 Crossing knees to sit. (Page 3607)
- AY531 Continuation. (Page 3613)
- See Rolling to Sit Theme
- Tag Sliding-hand-on-leg
- Tag Coming-to-sit
Scissoring legs on the floor:
- Amherst 2 – Week 6 – 07/15/81 PM2 Beginning of Scissoring Legs on Floor / Jumping Hurdles
- Amherst 2 – Week 6 – 07/16/81 AM Scissoring legs on floor / Jumping Hurdles
- AY073 Twisting the pelvis relative to the shoulders
- AY075 Twisting the shoulders relative to the pelvis.
- AY474 With the help of the limbs in the air, rolling to get up
- AY475 Midway exercise to the previous one
- AY531 Continuation
Splits:
- AY116 Spreading the legs and erecting the back
- AY211 The splits
- AY212 Basic spreading of the legs
- AY463 Sh pa gat or The splits
- AY511 Spread shpagat (Spread split)
Resources
- Add links
Share Your Insights (ideas, principles, strategies, experiences, …)
- Add your thoughts about the lesson here.
- Please sign your comments.
- Differing viewpoints are welcome and desired!
Disclaimer: This site is for sharing information about Feldenkrais® Awareness Through Movement® lessons. The information included on this site is for educational purposes only. Nothing on Feldy Notebook should be construed as an attempt to offer medical advice or treatment.
All contributions to this website are licensed under the Creative Commons Attribution Share-Alike 3.0 License. Do not add any copyrighted information to this website. Feldy Notebook is sponsored by Kinetic Inquiry.